I was tasked to setup email conversion tracking, via our magento store.
This is very possible using ExactTarget, and you can read about the requirements here: http://help.exacttarget.com/en/documentation/exacttarget/content/conversion_tracking/
Making this work with Google Tag manager is a bit tricky, but possible
The process can be done in 3 easy steps:
1. Capture the relevant passed params from any cliked url from emails
2. Pass that data to the dataLayer
3. Use the data in GTM to push conversion tracking to ET
The first thing to get working, is the ability to get google tag manager working in your site.
I use an extension called CVM_GoogleTagManager by Chris Martin (https://github.com/CVM/Magento_GoogleTagManager)
This 3rd party extension works well for my needs, and inserts the required datalayer variable very neatly. An advantage is that the developer considered other work, and fires appropriate events, which allows me to inject more data into the layer.
You can very easily use the same idea desscribed here to work with other GTM implementations.
The code mentioned (plus more tracking capabilities), are available in my ExactTarget Extension located here: https://github.com/ProxiBlue/ExactTarget - note that this extension also pushes tracking data to exact target as per this document: https://help.exacttarget.com/en/documentation/collect_code/install_collect_code/
So lets get down to the nitty gritty of the functionality:
As desribed in the Exacttarget docs (http://help.exacttarget.com/en/documentation/exacttarget/content/conversion_tracking/), you need to capture a number of passed paramaters. These would be the tracking url data, as generated in the email links.
Will look something like this:
uses email address as tracking ID : ?j=1234567&e=sales@proxiblue.com.au&l=111_HTML&u=123456789&mid=77777777&jb=1
uses tracking_id as tracking ID: ?j=1234567&sfmc_sub=123456&sales@proxiblue.com.au&l=111_HTML&u=123456789&mid=77777777&jb=1
Salesforce has changed how the tracking works in 2017. The reasonong:
Q. What is the Personally Identifiable Information (PII) issue?
A. Conversions are logged when the email activity drives a relevant conversion event for the email recipient. Previously, that recipient was identified back to Salesforce Marketing Cloud using the email address as the identifier. The email recipient’s email address is appended to the links in the email so when the recipient opens the email and clicks on those links the data is passed to the web page. The destination web page may leverage a web analytics application, such as Google Analytics, which may then track and store the email address. Google Analytics considers an email address to be personally identifiable information (“PII”). Data and submission of PII to Google is not permitted under Google’s terms of service.
NOTE: the e=EMAIL param can (and must) still be passed in the link up and until Jan 26 2017. The code here will accept the e param, it simply is no longer required.
To capture this, simply listen in on this event: controller_front_send_response_before
Using the following code, will allow you to inject the required variables into teh session (for later use)
public function controller_front_send_response_before($observer)
{
     if (Mage::getStoreConfig('exacttarget/tracking/enable_conversion')) {
            $request = $observer->getFront()->getAction()->getRequest();
            $params = $request->getParams();
            #ref: https://help.exacttarget.com/en/documentation/exacttarget/content/conversion_tracking/
            if (0 === count(array_diff(['mid', 'j', 'sfmc_sub', 'l', 'u', 'jb'], array_keys($params)))) {
                 Mage::getSingleton('checkout/session')->setExactTargetConversionTracking($params);
            }
     }
}
So, if that worked, you will have the data in the session variable called
ExactTargetConversionTracking
The next step would be to create a new listener for the event
cvm_googletagmanager_get_datalayer
which, as mentioned previously, is fired by the GTM extension when the datalayer is built.
In my extension I simply place this code to listen to the event.
<cvm_googletagmanager_get_datalayer>
    <observers>
          <proxiblue_exacttarget_cvm_googletagmanager_get_datalayer>
                <class>proxiblue_exacttarget/observer</class>
                <method>cvm_googletagmanager_get_datalayer</method>
          </proxiblue_exacttarget_cvm_googletagmanager_get_datalayer>
     </observers>
</cvm_googletagmanager_get_datalayer>
and the code for the method as follows:
/**
 * Inject ET conversion data into datalayer
 *
 * @param $observer
 * @return $this
 */
public function cvm_googletagmanager_get_datalayer($observer)
{
 $dataLayer = $observer->getDataLayer();
 $params = Mage::getSingleton('checkout/session')->getExactTargetConversionTracking();
 if (count($params) > 1) {
 $dataLayer->setExactTargetConversion($params);
 if (Mage::getSingleton('checkout/session')->getResetExactTargetConversionTracking()){
 Mage::getSingleton('checkout/session')->setExactTargetConversionTracking(false);
 }
 }
 return $this;
}
As you can see in the code, I simply pull in the params, check they are populated, and then set them into the DataLayer, as an array, under the datalayer variable called : exact_target_conversion
You will also see I do a reset of the session data. This is flagged via the event
sales_order_place_after
which simply sets the relevant flag. This allows the session data to be cleared after a checkout was done, and prevents stale session data on the next visit.
public function sales_order_place_after($observer)
{
 //simply reset tracking data after sale was made.
 Mage::getSingleton('checkout/session')->setResetExactTargetConversionTracking(true);
}
Great, that is basically it for the magento side of things. Fairly easy and nothing tricky. You get the data, and store it for later use.
Next we need to setup Google Tag Manager.
The first step is to define some variable, which pulls in the dataLayer data.
Remember that the data in the layer will look like this (this also includes other data, which I will also use to push to ET):
dataLayer = [{"event":"transaction","transactionId":"2100101178","transactionDate":"2016-01-04","transactionTotal":75.95,"transactionShipping":9.95,"transactionTax":6,"transactionPaymentType":"Check \/ Money order","transactionCurrency":"AUD","transactionShippingMethod":"flatrate","transactionProducts":[{"name":"Bathroom Sponge (2 Pack) ","sku":"210244","category":"Bathroom care| ","price":60,"quantity":1}],"visitorId":"xxxxxx","visitorLoginState":"Logged in","visitorType":"General","visitorLifetimeValue":8517.85,"visitorExistingCustomer":"Yes","exact_target_conversion":{"j":"11111111","e":"sales@proxiblue.com.au","l":"111_HTML","u":"1234567","mid":"7200991","jb":"0"}}];
dataLayer = [{"event":"transaction","transactionId":"2100101178","transactionDate":"2016-01-04","transactionTotal":75.95,"transactionShipping":9.95,"transactionTax":6,"transactionPaymentType":"Check \/ Money order","transactionCurrency":"AUD","transactionShippingMethod":"flatrate","transactionProducts":[{"name":"Bathroom Sponge (2 Pack) ","sku":"210244","category":"Bathroom care| ","price":60,"quantity":1}],"visitorId":"xxxxxx","visitorLoginState":"Logged in","visitorType":"General","visitorLifetimeValue":8517.85,"visitorExistingCustomer":"Yes","exact_target_conversion":{"j":"11111111","sfmc_sub":"12345678","l":"111_HTML","u":"1234567","mid":"7200991","jb":"0"}}];
In GTM, click the 'variables tab', and select to create a new variable. You will need to create 6 new variables, one for each passed param from ET.

UPDATE 2017:
From Jan 2017, you will also need to create the new subscriber identifier var. leave the exact_target_conversion.e var created (or still create it) for any old/backwards compatibility.
The new var:
Basically, the variables are named to match what was used in the actual datalayer, making life simpler going forward

Now that you have all your variables configured, you can proceed with the actual tag. For this we will use a custom html snippet. In the snippet we simply place the image tracking pixel code, including the expected xml that is to be passed.
NOTE: This is now updated below as per new Tracking ID var. the old email var is left for backwards compatibility.
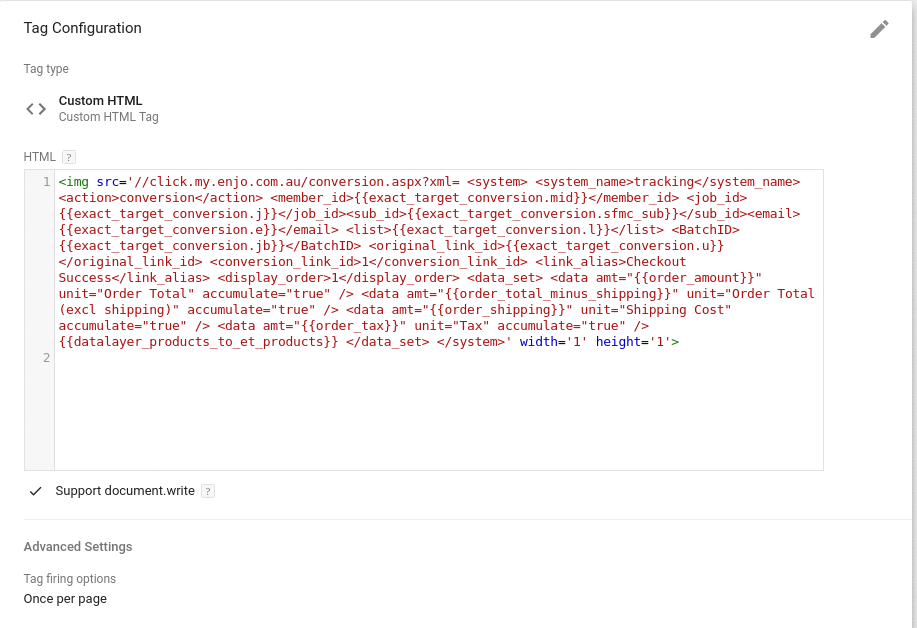
the actual code:
<img src='//click.my.enjo.com.au/conversion.aspx?xml= <system> <system_name>tracking</system_name> <action>conversion</action> <member_id>{{exact_target_conversion.mid}}</member_id> <job_id>{{exact_target_conversion.j}}</job_id> <email>{{exact_target_conversion.e}}</email> <list>{{exact_target_conversion.l}}</list> <BatchID>{{exact_target_conversion.jb}}</BatchID> <original_link_id>{{exact_target_conversion.u}}</original_link_id> <conversion_link_id>1</conversion_link_id> <link_alias>Checkout Success</link_alias> <display_order>1</display_order> <data_set> <data amt="{{order_amount}}" unit="Order Total" accumulate="true" /> <data amt="{{order_total_minus_shipping}}" unit="Order Total (excl shipping)" accumulate="true" /> <data amt="{{order_shipping}}" unit="Shipping Cost" accumulate="true" /> <data amt="{{order_tax}}" unit="Tax" accumulate="true" /> {{datalayer_products_to_et_products}} </data_set> </system>' width='1' height='1'>
<img src='//click.my.enjo.com.au/conversion.aspx?xml= <system> <system_name>tracking</system_name> <action>conversion</action> <member_id>{{exact_target_conversion.mid}}</member_id> <job_id>{{exact_target_conversion.j}}</job_id><sub_id>{{exact_target_conversion.sfmc_sub}}</sub_id><email>{{exact_target_conversion.e}}</email> <list>{{exact_target_conversion.l}}</list> <BatchID>{{exact_target_conversion.jb}}</BatchID> <original_link_id>{{exact_target_conversion.u}}</original_link_id> <conversion_link_id>1</conversion_link_id> <link_alias>Checkout Success</link_alias> <display_order>1</display_order> <data_set> <data amt="{{order_amount}}" unit="Order Total" accumulate="true" /> <data amt="{{order_total_minus_shipping}}" unit="Order Total (excl shipping)" accumulate="true" /> <data amt="{{order_shipping}}" unit="Shipping Cost" accumulate="true" /> <data amt="{{order_tax}}" unit="Tax" accumulate="true" /> {{datalayer_products_to_et_products}} </data_set> </system>' width='1' height='1'>
In the code above you will see we inject the appropriate values using GTM variables we defined earlier.
You will also see I inject some additional data, via the <data_set> element.
For completeness here they are, and how I get them
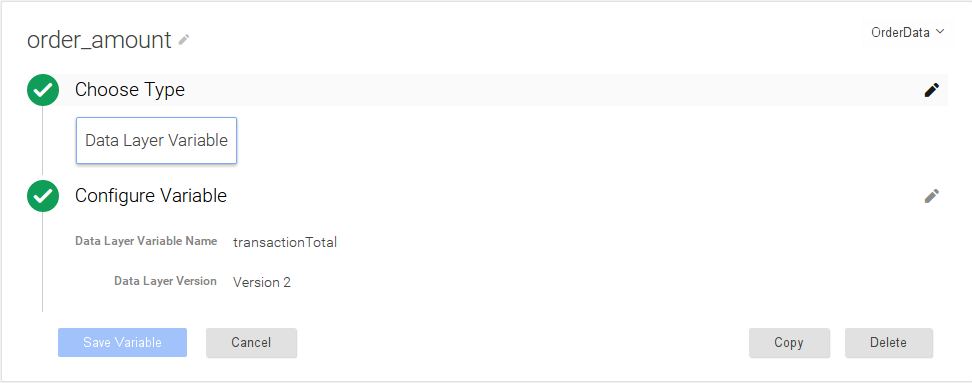
<data amt="123" unit="Order Total" accumulate="true" />
The total order amount. Collected via the dataLayer (inserted using the before mentioned extensions in this article)
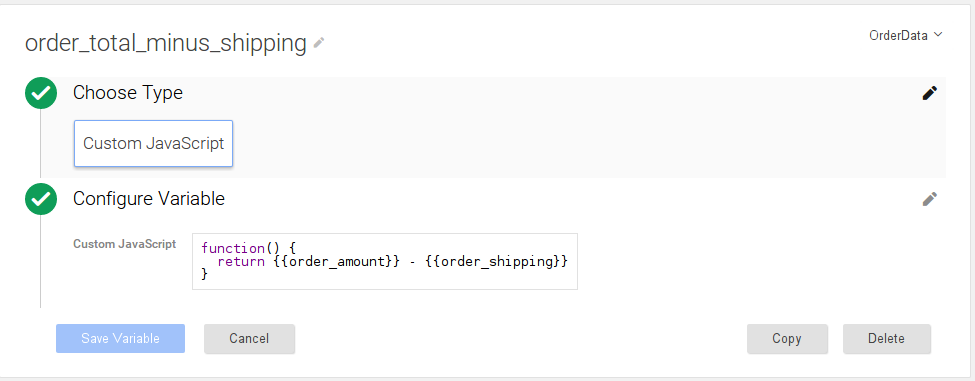
<data amt="123" unit="Order Total (excl shipping)" accumulate="true" />
As it says on the box. Order total minus shipping
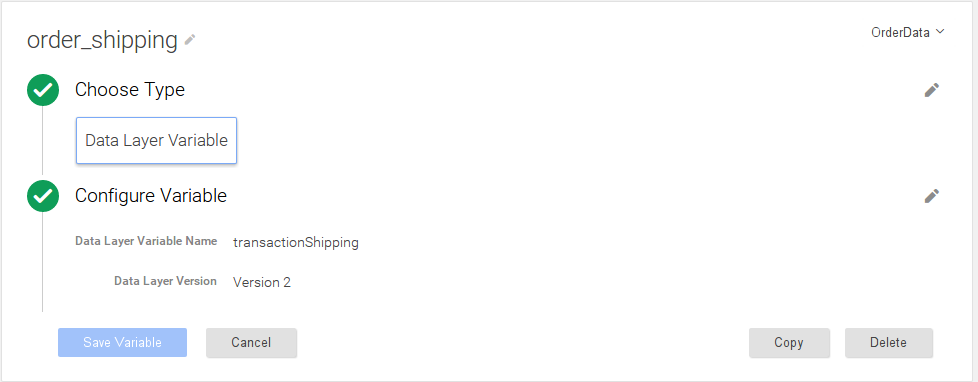
<data amt="123" unit="Shipping Cost" accumulate="true" />
The total shipping cost for the order
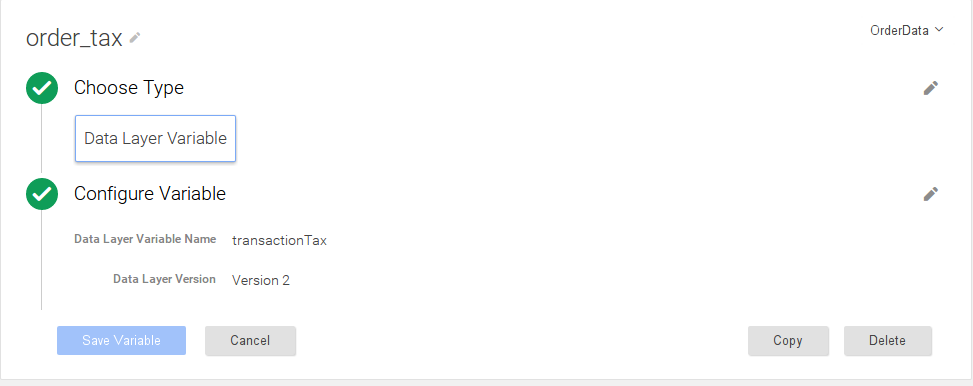
<data amt="" unit="Tax" accumulate="true" />
The total tx for the order
And finally the line items, which is generated from a Custom Javascript Variable. Basically, the order line items are in the dataLayer, but not in a format that I want. Rather than pushing another copy of the data into the layer, I use the javascript snippet to reformat the data to something I can inject to the xml query
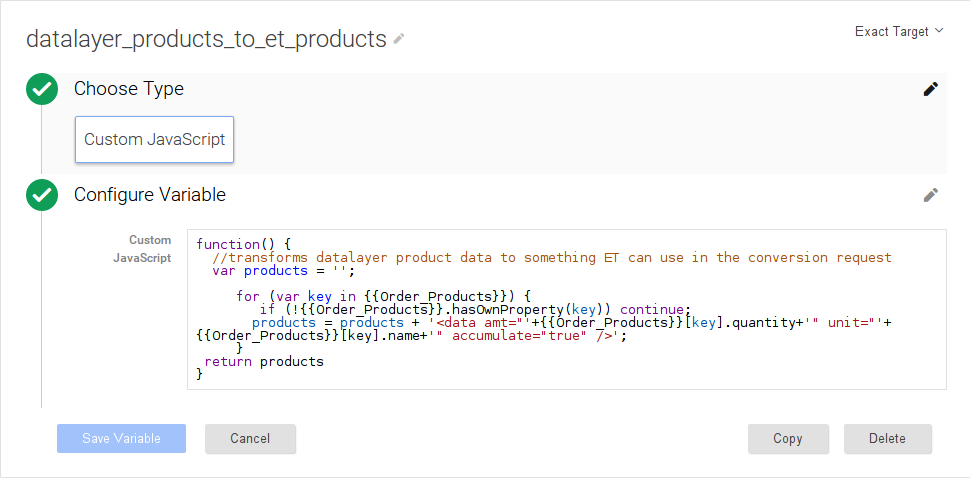
the actual code:
function() {
 //transforms datalayer product data to something ET can use in the conversion request
 var products = '';

 for (var key in {{Order_Products}}) {
 if (!{{Order_Products}}.hasOwnProperty(key)) continue;
 products = products + '<data amt="'+{{Order_Products}}[key].quantity+'" unit="'+{{Order_Products}}[key].name+'" accumulate="true" />';
 }
 return products
}